While I might not have been overly consumed by the Christmas spirit this year, I have found myself addicted to this rich Christmas-y green, red, & gold plaid. Last year, my Mom recruited me to come up with fun ideas for Christmas dinner while entertaining my brother’s fiance’s family, and we had so much fun that we decided to have another go at planning this year!
“I’m Dreaming… of a plaid…. Christmas!”
Something like that anyway. This project was actually a really fun idea in motion. I’m going to admit something… it was inspired by a project from A Beautiful Mess. That being said, I knew right from the beginning that I wasn’t going to copy it, as well as that I would not accomplish something anywhere near as polished. Then, to top it off… through the process of the project I continually shot myself in the foot at nearly every step, almost to the point where I didn’t finish it multiple times out of sheer frustration.
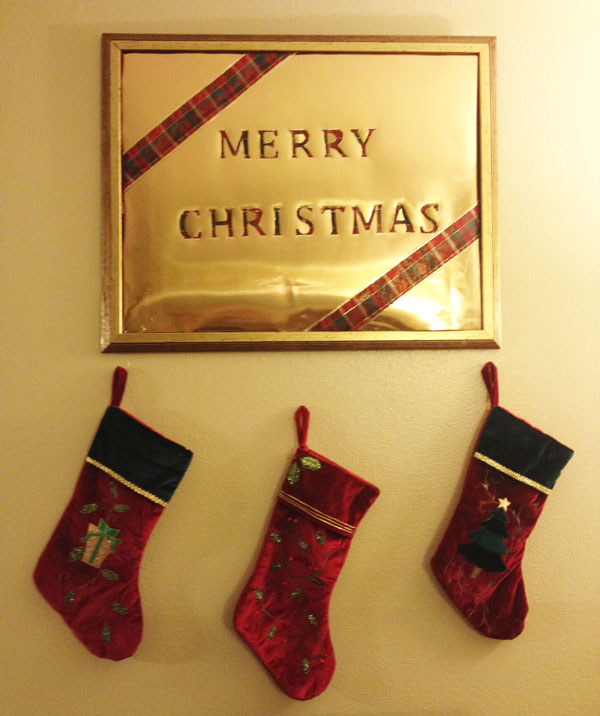
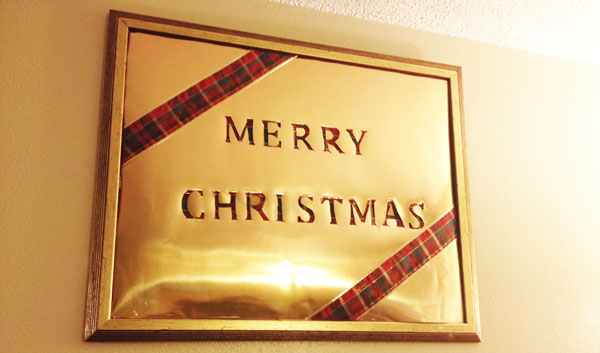
So here is the beautiful Light Box Marquee DIY that inspired the idea, not as much as a marquee as the idea of doing a DIY framed artwork for the mantle at my mom’s house. This is the first change in direction. While I was hunting for my frame at Goodwill, I had to talk my mom through how to find my Christmas board on Pintrest (love you mom don’t hate me!). Once this was accomplished, she immediately shot down the mantle idea, a she had already decorated hers and didn’t want to have to start over, as well as she was worried that the art just wouldn’t look right in front her over-sized mirror already on the mantle.
Moving Targets
So, first redirect… we would hang it in place of art she had right over the kitchen peninsula, which is right next to the dining room table and the perfect placement to compliment the table setup we are going to attempt. But lights just simply wouldn’t work since it would be hung instead of leaned on a wall, and since I wanted to make this idea more of my own, I was 100% ok with this. So the plan changed to do gold letters over plaid wrapping paper which I would tape to the inside of the glass of the thrifted frame.
Second redirect… I just COULD NOT find the wrapping paper I wanted. Humpfff. There just wasn’t anything to match what I was looking for. So while walking around Hobby Lobby, I was struck with a new/borrowed idea. I could still cut the letters out of gold tagboard, and just use the plaid ribbon I found and loved behind the cutouts. Perfect.
She shoots…
The thrifted frame came as a completed piece, but all I had to do was pull the paper backing off, and carefully pry the staples out. They were a little tight, so I used just a slight bit of pressure to push them out of the frame enough to grab with needle nose pliers. This technique worked for half of the staples before the glass broke into three large pieces. I was just about to give up here, but after determining my tagboard was just the right size to fit perfectly into the frame, I decided to push ahead without the glass!
She scores!
This is where I feel like I did the most damage. I have in the instructions below to use an X-Acto knife. Don’t do what I did and try to save money and skip buying the X-Acto knife, thinking that a box cutter will work the same. Please… it really doesn’t work. I managed to get this “close enough” and I just don’t have the energy to do it again even though I have literally debated doing so for an entire week… I just feel like it could be so much better. The letters… they are not perfect. Now my Mom, bless her, absolutely loves it. I also agree that it is cute. Its just not quite to the level of quality I had wanted. So, please, learn from my mistakes, I know you will love what you do because of it!
The rest worked out just fine… so with this lovely peek behind the scenes…
A Very Merry Christmas Artwork DIY
You will need:
- 3 inch wide Ribbon (plaid or other color choice for your theme)
- Tagboard, large enough to fit your frame.
- Picture frame. I wanted a large frame, and thrifted frames are great for this. Mine was only $8 for a 2.5 x 3 ft. frame. I was also able to find one in a gold and deep burgundy, which looks great with my plaid theme!
- Hot glue gun
- Letter stencils and a pencil (you can make your own by printing out large letters from Microsoft word, then cutting them out for some DIY stencils)
- X-Acto knife and cutting mat (read warning above… please)
- Scotch tape
- Scissors
- Large piece of cardboard (optional)
Instructions:
1. Start by prepping your frame if necessary. If you don’t need to do anything here, skip to step 2. If so, very carefully remove any backing, staples, artwork, etc from your frame. Don’t be a bonehead and break the glass using brute force like I did.
2. Use your stencils to trace out your letters on the back of your tagboard. Remember to flip them backwards and spell it backwards so it reads correctly from the front!
3. Using your X-Acto knife and cutting mat, cut out the letters of your phrase. If you do Merry Christmas, or any word with words such as capitol R or A where the center portion is cut out with the border, save these, as you will want to use them soon.
4. Once all letters are cut out, flip the tagboard over and clean up any ragged edges. Flip back over. Take your wide 3 inch ribbon and place over the back of the letters. Mine were just 3 inches in height, so I got away with using just one piece of ribbon per word, but feel free to layer if needed. Use the scotch tape or hot glue gun to secure ribbon in place.
5. Flip your artwork back over and determine how you want to decoratively place your ribbon on the front (If at all). I toyed with the idea of running the ribbon down each side, or doing a cross pattern, one piece of ribbon through the center of the two words and the other off to the left side. Ultimately, I liked the angled stripes pictured best. Measure your ribbon plus a little extra, and cut.
6. Use the hot glue gun to adhere the ribbon in place on the tagboard. When you get to the ends, glue along the edge of the tagboard, then fold the excess over tightly so there is no slack, and glue to the back.
7. Here is where you want those R’s & A. Cut out the center “D” shape of the R and the triangle from the top of the A. Hot glue each in place to the ribbon.
8. If you don’t have glass in your frame, glue the tagboard to the inside of the frame. Otherwise, set flush against the glass. If your frame has a back, or if the artwork (which is often on thin cardboard) can be placed as the back, you can use this to keep the tagboard in place. If you don’t have this, the optional piece of cardboard could come in handy here. Use the scotch tape (or something stronger if you deem necessary) to hold it all in the frame. If you are REALLY lucky, you may even have foldable or moveable tabs that you can simply move back into place.
9. Hang in place over your mantle or place of honor (such as over the television in my case). If the frame doesn’t come with hanging materials, you can find some great tools at most stores such as Walmart, Target, Menards, etc. either with a serrated tooth hook you can gently hammer into the frame, or with flexible wire that can be stretched between two hooks if you only want to use one nail in your wall.
Now hang it up, sit back with you hot chocolate (or, you know, wine), admire your work, and be glad you didn’t make any of my silly mistakes.


 Hi! I'm Alyce.