From the first moment I heard “Addict with a Pen” by Twenty One Pilots (my first TOP song), I was hooked. I cannot begin to express how much the lyrics speak to me. It is something so raw and beautiful to address the terrifying and incapacitating feelings that accompany mental illness and still be so insanely hopeful and optimistic.
(Looking for more on how I did the look? Scroll down!)
“Am I the only one I know
Waging my wars behind my face and above my throat
Shadows will scream that I’m alone
But I know, we’ve made it this far, kid.”– Migraine, Twenty One Pilots
![]()
This look was inspired by the cover art for their self titled album, Twenty One Pilots, from which my favorite song, “Addict with a Pen,” originates.
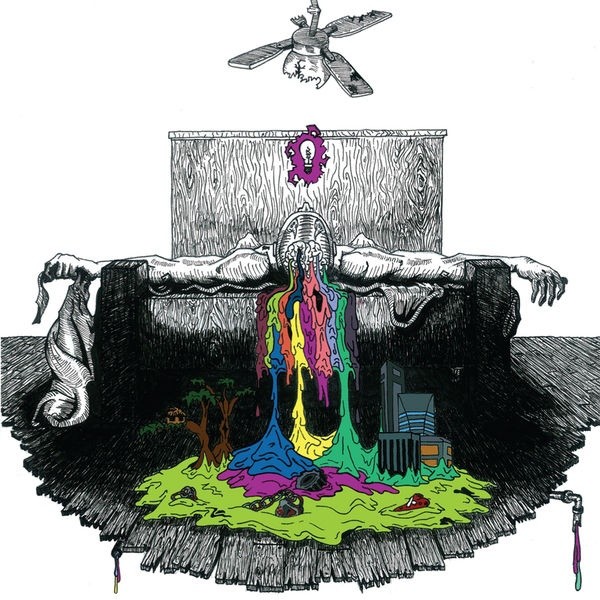
I realize that Migraine is on the Blurry Face album, but I really connected with the lyrics, and envisioned a bit of a mashup of the colors and artwork with the song lyrics:
“I am not as fine as I seem
Pardon, me for yelling and telling you green gardens
Are not what’s growing in my psyche, it’s a different me
A difficult beast feasting on burnt down trees
Freeze frame, please let me paint a mental picture portrait
Something you won’t forget, it’s all about my forehead
And how it is a door that hold’s back contents
That makes Pandora’s box contents look non-violent”– Migraine, Twenty One Pilots
Honestly, I have a pile of sticky notes of ideas inspired by TOP songs, many of which I have had in the pile for well over a year… this one included. I hope to complete more ideas soon!
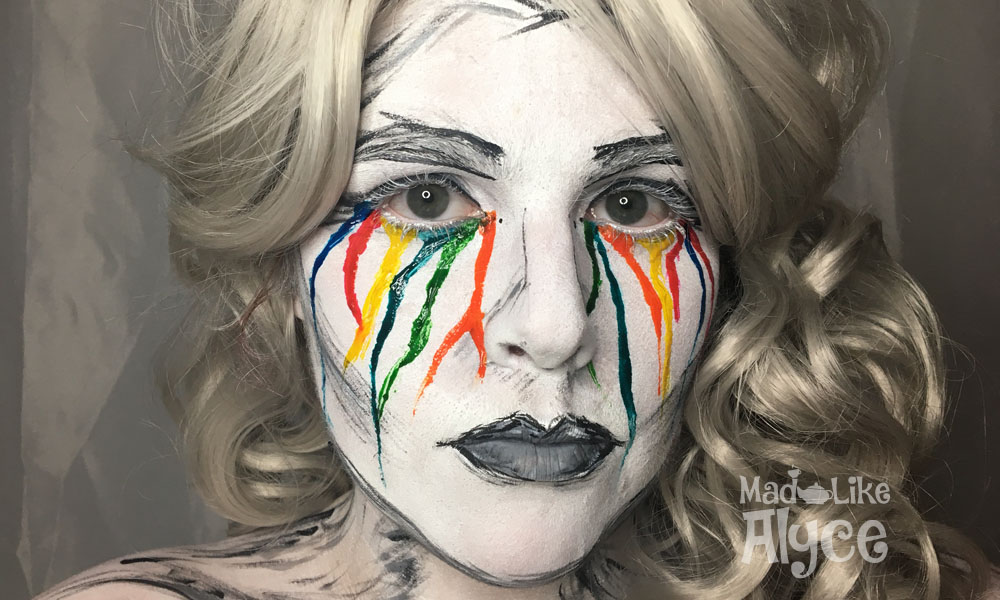
Migraine by Twenty One Pilots Makeup Tutorial
So, I’ve been a bit lazy (overworked, exhausted, stressed, take your pick) so I have been just trying to work on makeup looks without doing the full filmed tutorial. I seriously have to hand it to make up artists who post videos even once a week. Its so much work!
While it does make it easier for me, I don’t have a full on tutorial, but kind of have it outlined for you below.
Products used:
- Mehron aqua paints in white, grey and black.
- Nyx jumbo eye pencil in Milk.
- Liquid Latex
- Dixie cups, and cheap paintbrushes
- Cream paint in colors of your choice. You can also use food coloring, which I did, however, this WILL dye your skin a bit. It came off within 24 hours, but I did need to wear makeup the next day since there was a faint hint from the magenta tears.
- Vaseline, so you don’t rip out your eyelashes, which I will explain more below.
- Wig from Rockstar wigs, Long Curly in Silver.
Instructions
1. Start by basing out your face, neck, and shoulders in white. I did skip my lips since I planned on making them grey.
2. I next went in and worked on the most solid features, which were the lips, eyes, and eyebrows. On the lips, I started with grey paint, then used a very small detail brush to make brush strokes in black to outline them. I then used white to add very small hints of highlight.
3. The eyebrows were next, which i made large strokes to outline the outsides of the brow, similar to how you would normally, but extended the lines past the arch, then barely filled them in.
4. The eyes were lined with black on the top lid, and I placed a few “pin drops” extending to the inner eye. I then used black in the crease, starting in the middle of my eye at the apex of the crease to the outside of my eye, connecting it to the bottom lash line. Leave the bottom lash clean, since we will be adding tears later.
5. Outline your face with brush strokes. I started with grey first, then went back over with black so it would have some varied dimension. Finally, take that “sketching” down either side of your neck, along the back of your trapezius muscle (back of your shoulders), and along your collar bone. I also went over the top of these with white paint again, since the harsher strokes of white still stand out fairly well against the base coat.
6. Very gently add brush strokes along the sides of your nose, and add just the faintest shadowing below the nostril. I’m not sure how else to describe it, so check out the image below for reference.
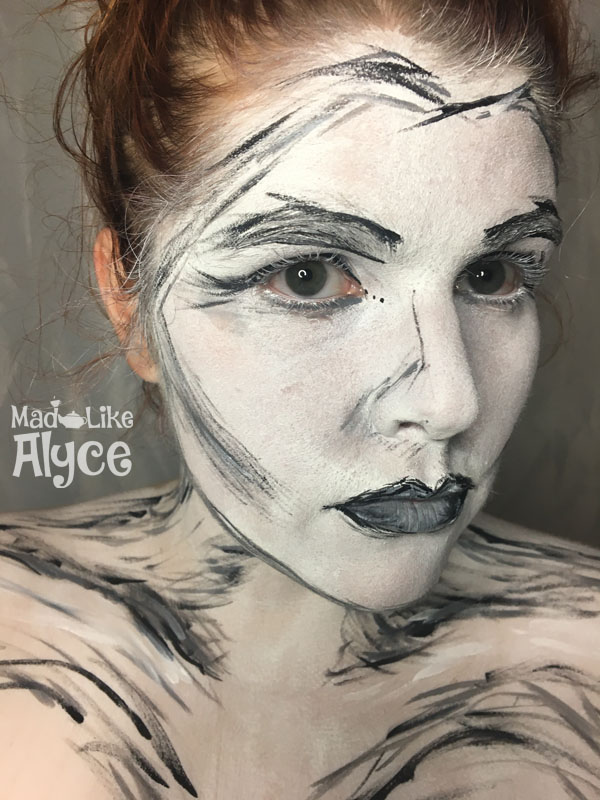
7. Finally for the “drawn” part, I dry brushed a contour onto my cheeks using very light strokes. The result before adding the tears looked like this:
8. Ok guys, here is were we get into the nitty gritty. First of all, PLEASE be careful with products and tools you use around your eyes. They are kind of important. Secondly, protect your eyelashes on both top and bottom using vaseline. If you have a clean mascara spooly, you can use that to coat them, but just getting some vaseline on your fingers and rubbing it on them will do. Latex CAN and WILL rip out hairs, so never apply this to your eyebrows, eyelashes, etc. Not the look you are going for, I’d guarantee it.
You can also see more on this from where I got the idea of latex tears, which is from Glam & Gore’s Death Stranding makeup tutorial. Mykie is a goddess, so you should follow her anyway.
9. Mix your colors. Pour out the latex into the dixie cups – one for each color, and just a teaspoon to a tablespoon will be more than sufficient in each. Mix in the food coloring/cream paints until the latex is evenly mixed. Note that the latex will be a lot darker when it dries, so it does help to do a test swipe on the back of your hand to see what it will be once it dries.
10. VERY CAREFULLY trace your tears on. I recommend using fine pointed and cheap paintbrushes, because latex will ruin them. I actually used a toothpick to apply mine, but again BE CAREFUL around your eyes, seriously you guys. Draw the tear trails down, and continue to build them up until you have them as thick as you would like. Then, make sure to fill below your eye with the various colors so there is no white space between tear trails. When you cry for real, tears often pool in the eye before falling.
11. Allow to dry fully, which should only take a couple of minutes. You will know when it is starting to dry, because you will feel it…. it feels weird!
Add your wig, and below is the final result! Normal makeup remover will remove the latex, and I would recommend not to do this look before an event requiring photos for any reason, as the tears may stain your skin.
Be sure to follow me on Instagram @madlikealyce to see these looks as they are created! I usually have a story or two posted right as I complete the look, and I almost always get these pictures up on Instagram before cranking out the final post.


 Hi! I'm Alyce.